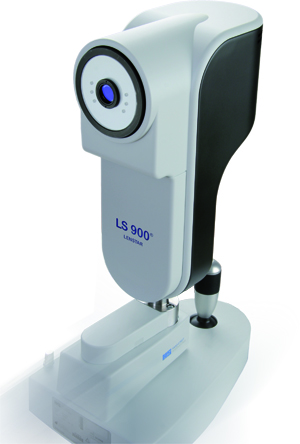
Haag Streit LENSTAR® - Operation
Imaging
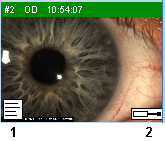
Click on images to enlarge for better viewing.
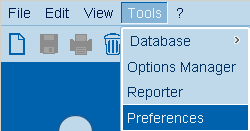
Preferences
To make working with the program as simple as possible, we recommend you to set the preferences for your application.
Menu bar
Tools -> Preferences

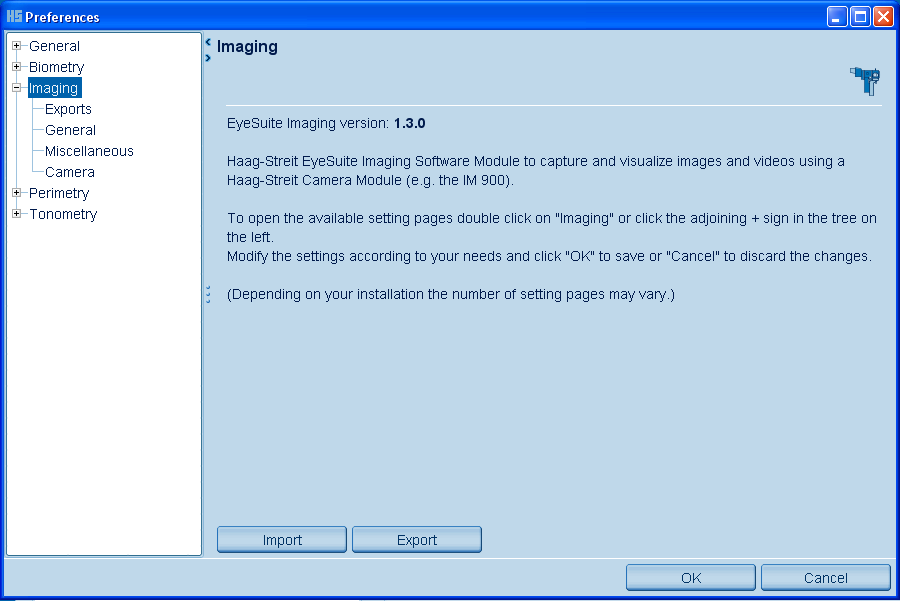
Program information
Tools -> Preferences -> Imaging

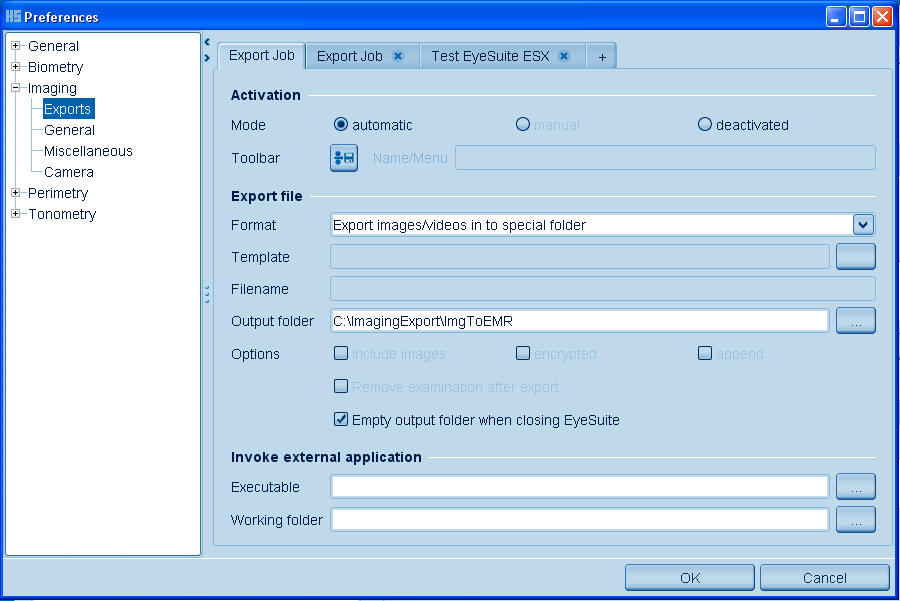
Exports
Tools -> Preferences -> Imaging -> Exports
Please note that this options (from previous EyeSuite versions) has moved to the Exports setting (see following screen):
- Export folder path
- Export files automatically to special export folder
- Delete files in special export folder when ES is closed
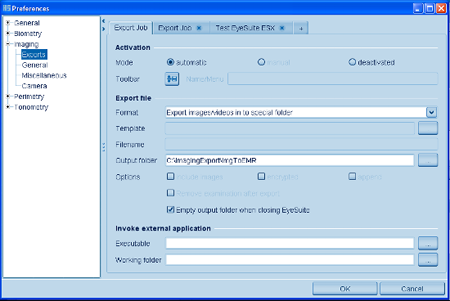
"Export images/videos into special folder": Creates a copy of every image/video captured in the export folder.
"Empty output folder when closing EyeSuite": Deletes the files in the special folder when EyeSuite is closed.

To create your own export button icon in the tool bar:
- click on "manual" mode
- click on the "tool bar export button" and follow the screen.
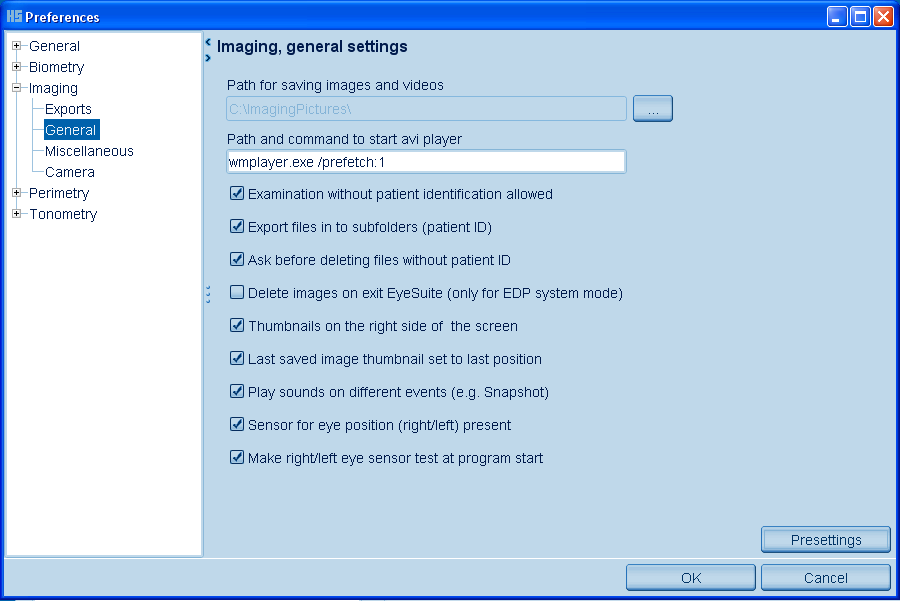
General settings
Tools -> Preferences -> Imaging -> General

To be independent of mounted drive letters e.g. "L:\", the "Path for saving images and videos" can also be entered for example this way:
\\servername\subdirectory\ImagingPictures\
If all paths in the database must be changed due to a movement of the images to a server (see setting "Path for saving images and videos"), there is a possibility in EyeSuite Imaging for doing this.
Start EyeSuite with the parameter -attentionchangeimagepathes (e.g. "C:\Program Files\Haag-Streit\EyeSuite\EyeSuite.exe" -attentionchangeimagepathes) and open the "Imaging" application. You will be guided to do the changes.
If EyeSuite is used with the Release Module RM 01 please select '''Sensor for eye position (right/left) present''' for to have automatic assignment of the images to the right or left eye.
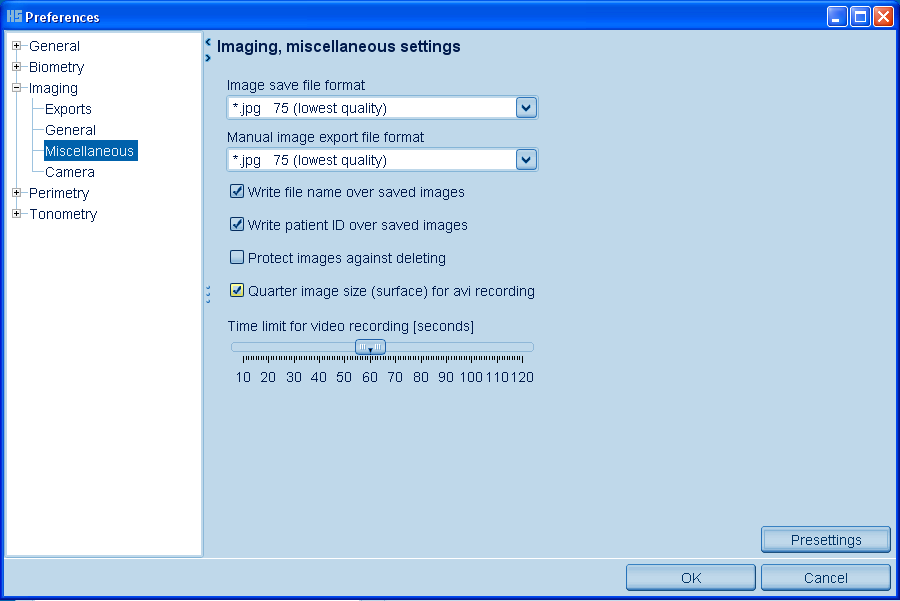
Miscellaneous settings
Tools -> Preferences -> Imaging -> Miscellaneous

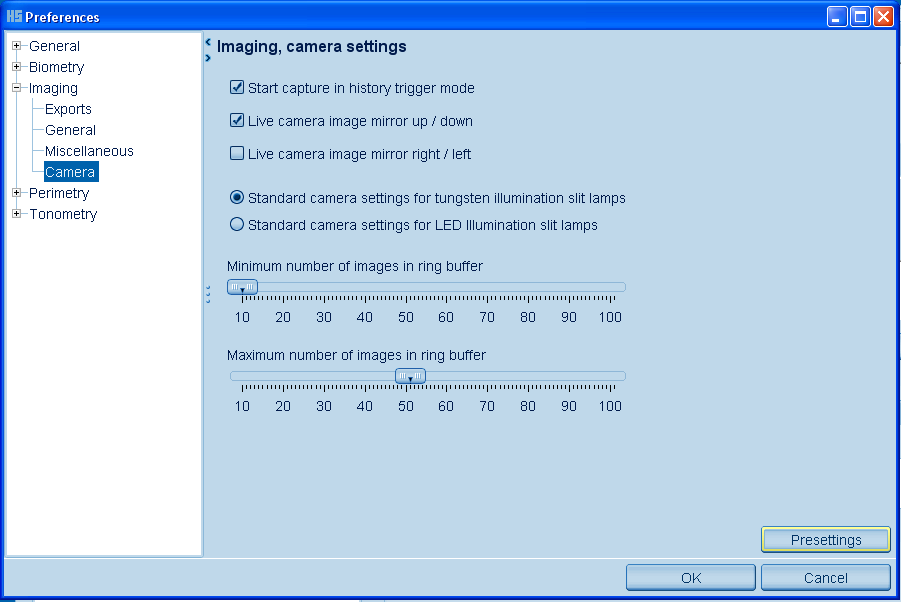
Camera settings
Tools -> Preferences -> Imaging -> Camera
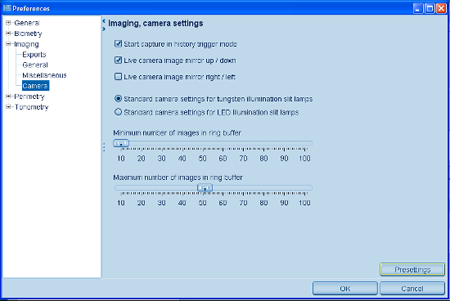
Number of images in the ring buffer will set the number of images used in the history trigger mode.
Capture Images Without Patient ID
- Open EyeSuite.
- Click on the slit lamp or Imaging button on the left side.
- The live screen opens automatically. If you do not have connected the camera module, a warning sign will pop-up. In this case you must close EyeSuite and restart EyeSuite after you have connected the camera module.
- Get the slit lamp in focus.
- Adjust the brightness level by changing the light, the exposure time (release module, mouse wheel or exposure time button in the tool bar), the master gain or the aperture (hardware).
- Press the release button on the release module or use the snapshot button (tool bar).
- Press again the release button on the release module or "Save this image" on the screen.
- If you missed the right moment (best picture) or the patient blinked, use the history trigger to select the best picture by pressing -1 or +1 or using the mouse wheel. To store the selected picture, press again the release button on the release module or "Save this image" on the screen.
- Close the "Sequence Control" screen.
- Press "End of Examination" (tool bar: cross button) and follow the sign.
- If you press "no", the live screen will continue. If you press "yes", the picture is dedicated to an undefined patient.
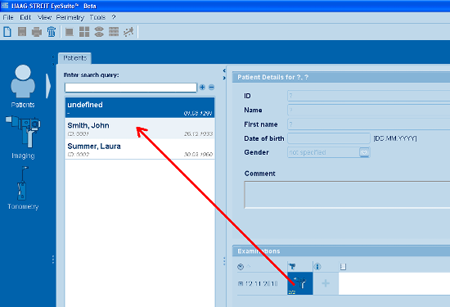
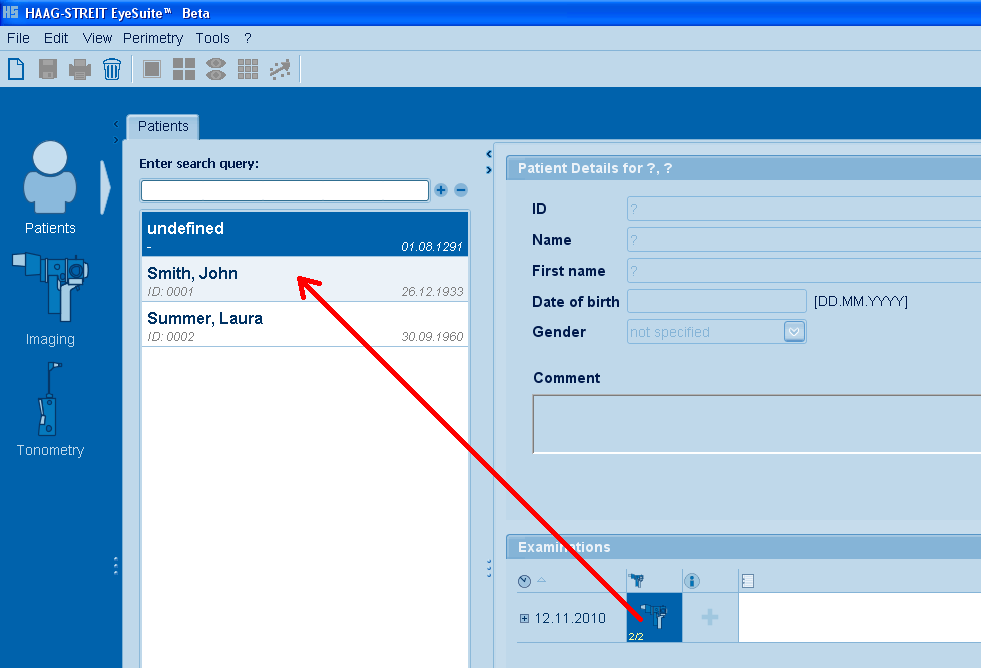
- To save the picture to an patient with ID, click on the small slit lamp icon (Examinations), select the desired patient and move the icon to this patient.
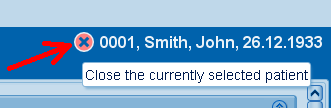
If a patient is selected, please close the current patient before you can capture images without patient ID (see below).

Capture Images with Patient ID
- Open EyeSuite.
- Select the desired patient.
- Click on the slit lamp or Imaging button on the left side.
- A hint window about the free Software limitation will pop-up. Press OK
- The live screen opens automatically. If you don't have connected the camera module, a warning sign will pop-up. In this case you must close EyeSuite and restart EyeSuite after you have connected the camera module.
- Get the slit lamp in focus.
- Adjust the brightness level by changing the light, the exposure time (release module, mouse wheel or exposure time button in the tool bar), the master gain or the aperture (hardware).
- Press the release button on the release module or use the snapshot button (tool bar).
- Press again the release button on the release module or "Save this image" on the screen.
- If you missed the right moment (best picture) or the patient blinked, use the history trigger to select the best picture by pressing -1 or +1 or using the mouse wheel. To store the selected picture, press again the release button on the release module or "Save this image" on the screen.
- Close the "Sequence Control" screen.
- Press "End of Examination" (tool bar: cross button).
- The image is dedicated to the desired patient (examinations).
Toolbars
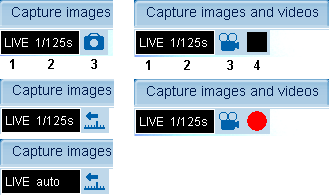
Capture Mode
The tool bar in the capture mode is displayed when the live screen is active.

- Live image on the screen. Switch between capture and viewing mode.
- Photo mode. Capture picture without history trigger.
- History trigger mode.
- Video mode (optionally).
- Snap shot (trigger). Only enabled, if "Sensor for eye position (right/left) present" is disabled in the Imaging general settings.
- Camera pre-settings 1,2,3 (different brightness level).
- Automatic mode (brightness control by automatically adjusting exposure time and gain).
- Exposure time setting.
- Brightness and contrast adjustment.
- Gain control camera (set gain, black level and quality).
- Gamma correction camera.
- If selected, thumbnails for both eyes are displayed.
- Thumbnails on/off.
- 1 image display.
- 2 image display.
- 4 image display.
- Present image smaller/enlarged.
- Select right eye. Only enabled, if "Sensor for eye position (right/left) present" is disabled in the Imaging general settings.
- Select left eye. Only enabled, if "Sensor for eye position (right/left) present" is disabled in the Imaging general settings.
- End of examination.
Viewing Mode
The tool bar in the viewing mode is displayed when the live screen is closed.

- Print button (only for selected images on the thumbnails).
- Delete button (only for selected images on the thumbnails).
- Live image on the screen. Switch between capture and viewing mode.
- If selected, thumbnails for both eyes are displayed.
- Thumbnails on/off.
- 1 image display.
- 2 image display.
- 4 image display.
- Present image smaller/enlarged.
- Select right (OD) / left (OS) eye.
- Image editing (please select image first!).
- Crop image (use right mouse button or press again "crop image" button to save selected area).
- Ruler (pixel).
- Orientation grid (spider web like structure with 5° separation).
- Import image to the current session.
- Export all images and videos from this date to an folder (if "Export files into subfolders" in the general settings is selected, images and videos are exported into subfolders with the patient ID name).
- End of examination.
Thumbnails
Preview of captured and saved pictures.
According to the setting in the preferences, the thumbnails are displayed on the right side or below the screen.
Right (OD) / Left (OS) Assignment
Manual Assignment
If EyeSuite is used without the Release Modul RM 01 or in combination with the small Release Modul RMX 01, there is no automatic assignment of the images to the right or left eye. In this case, the assignment can be done manually at the time of capture using the "OD/OS" button in the tool bar or after capture using the right mouse button on the image displayed in the thumbnail. In the viewing mode (no live screen), the assignment can be done with a right mouse click on the thumbnail.
Manually assigned right or left orientation of an image can always be corrected.
For the manually assignment, the respective option in the general settings has to be disabled. ("Sensor for eye position present")
Automatic Assignment
If EyeSuite is used with the Release Module RM 01, images are automatically assigned to the right (OD) or left (OS) eye.

Automatically assigned right or left orientation of an image cannot be changed.
For the automatically assignment, the respective option in the general settings has to be enabled. ("Sensor for eye position present")

- Indicates that a note for this image exist.
- Indication for manually saved images (e.g. cropped image or image with orientation grid).
Capture Mode
To enter the capture mode, click on the slit lamp (left side of the patient screen) or first select the desired patient.
Images can only be captured if the live window is active. (if it is not open please press the "Live" button in the tool bar).
The software is limited to capture images to max. 50 patients!

- Live window indication.
- Exposure time or automatic.
- Operation mode (photo, history trigger, video).
- Video operation mode (stop, record)
Exposure Time
The Exposure time can be changed as follows:
- Using the mouse wheel while keeping the mouse sign on the active. screen.
- Press the intended buttons on the release module.
- Click on the "Exposure time" button on the tool bar and change the value manually.
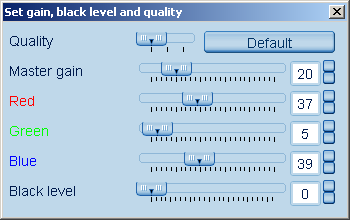
Gain Control
The Gain control can be changed as follows:
Click on the "Gain* button on the tool bar and move the sliders.

Camera Settings 1,2,3
Click on the "Camera settings" button on the tool bar

Default settings:
- Camera setting 1: Exposure time 1/125s; Master gain 20
- Camera setting 2: Exposure time 1/90s; Master gain 40
- Camera setting 3: Exposure time 1/60s; Master gain 60
For special applications, all camera settings can be changed individually. Click with the right mouse button on the live screen and follow "Save camera setting".
Automatic Mode
Click on the "Automatic camera" button in the tool bar Now, the brightness is controlled automatically by the camera.

- Priority 1: Exposure time.
The automatic mode is automatically terminated if the exposure time or the master gain is changed manually.
To reactivate the automatic brightness control, press again the "A" button in the tool bar
Aperture Control
The aperture can only be changed (manual) on the Imaging Module IM 900 and the Camera Module CM 900 with the Video adapter for the BQ 900.
The aperture control also influences the depth of field.
Brightness and Contrast
Click on the "Brightness and contrast" button on the tool bar and place the dot on the screen in a different position to change capture brightness and contrast.
Gamma Correction
Click on the "Gamma correction" button on the tool bar and move the slider to change gamma capture settings.
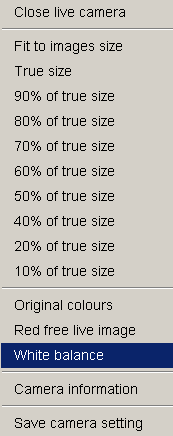
White Balance
Place a white paper in front of the slit lamp and click with the right mouse button on the live screen. Follow "White balance".

Be sure that the image is not overexposed.
History Trigger
Images can be captured with or without history trigger.
For to get best picture quality, Haag-Streit recommends to use the history trigger.
In standard configuration the history trigger is enabled (history trigger button in the tool bar shows active.).
How does it work?
- A high resolution video stream is capture in the background till the release button (release modul) or the snap shot button (tool bar) is pressed.
- Once you captured the image, the history trigger gives you the opportunity to go back and select the best picture.
- Number of pictures in the ring buffer can be set in the preferences (camera settings).
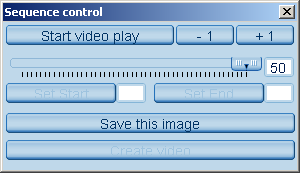
After you have captured the picture in the live mode the following window will pop-up:

"Start video play": Display of history mode as video.
"-1 / +1": Go one frame (picture) back or forward in time (also possible with the mouse wheel).
"Save this image": Confirm capture of image.
The image is automatically shown in the thumbnails.
Capture images without history trigger
Click on the "Photo mode" button in the tool bar
After you have captured the image with the release module or the snap shot button (tool bar) the image is automatically shown in the thumbnails.
Video Option
The video module captures and stores video sequences.
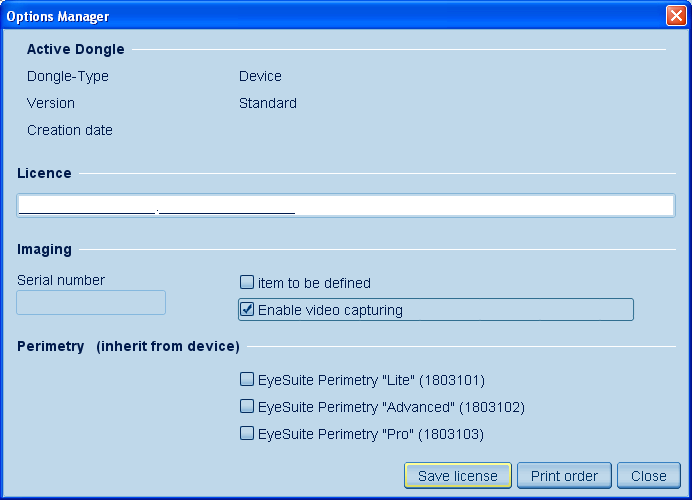
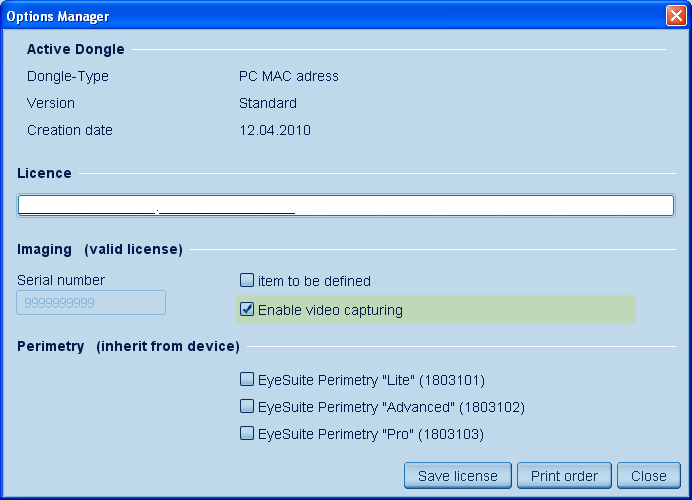
This is an optional function and must be bought and licensed (Menu bar -> Tools -> Options manager).

The serial number of the camera shall be displayed after starting imaging capture (live screen) and the software has recognized the camera.

Video Segment Capture
- Press the video button (tool bar) to start the video capture mode.
- Press the capture button on the release module to start the video.
- Press the capture button again to stop the video capture.
The thumbnails of the videos are indicated with a video strip icon.
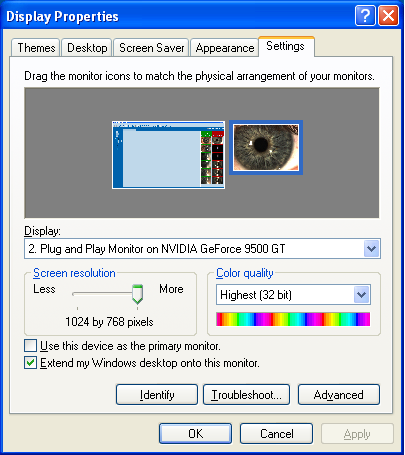
Dual Screen
EyeSuite offers you the possibility to display the live screen on a second monitor.
Please choose the following settings: Desktop -> Properties -> Settings

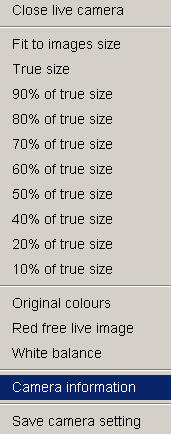
Close Live Camera
Click with the right mouse button on the live screen and follow "Close live camera".
Viewing Images
Captured images are automatically displayed in the thumbnails. If "Sensor for eye position (right/left) present" is activated in the general camera settings, the images are automatically assigned to the right eye.
To enlarge the pictures, you should first close the live screen. (right mouse button, "Close live camera") Then double-click on the desired picture in the thumbnail or move the picture with drag and drop to the active screen.
You can choose 1, 2 or 4 image display (tool bar).
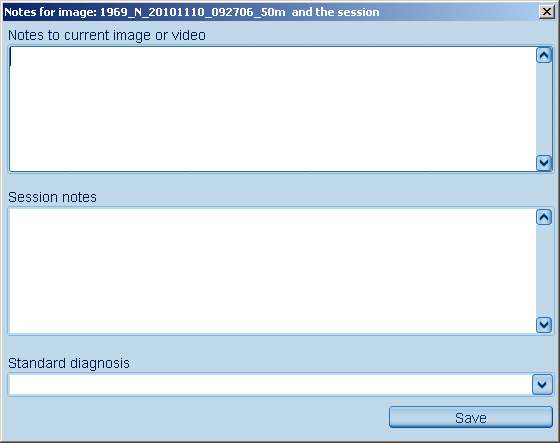
Image Notes
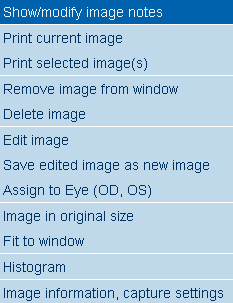
Click with the right mouse button on the enlarged image.


If text exist for the corresponding image, the thumbnail image is marked with a text symbol.
Deleting Images
Click with the right mouse button on the enlarged picture and follow "Delete image".
Select the desired picture in the thumbnails (hold "Ctrl" key down while clicking on the picture) and press the right mouse button.
Follow "Delete selected image or video".
Live Image Settings
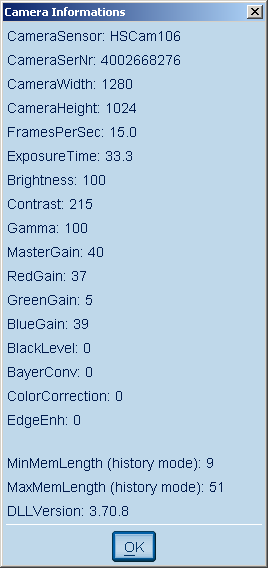
Click with the right mouse button on the live screen to get the following opportunities and informations:
Key Shortcuts
The Release Modules of the Imaging Module uses the following shortcuts keys:
- Ctrl Alt F6 (right eye detection)
- Ctrl Alt F7 (left eye detection)
- Ctrl Alt F10/F11 (shorter exposure time)
- Ctrl Alt F9/F12 (longer exposure time)
Troubleshooting
If a dialog window pops up while using the Release Module, you have to disable the shortcut function with the respective application.
E.g. Intel graphic card:
Desktop -> Properties -> Settings -> Advanced -> Disable shortcuts
End of Examination
Click on the cross button "End of examination" on the tool bar to return to the patient.
If you have done the examination without a patient ID, the images or videos will be saved to an undefined patient.
To save the picture to an patient with ID, click on the small slit lamp icon (Examinations) and move the icon to the desired patient.
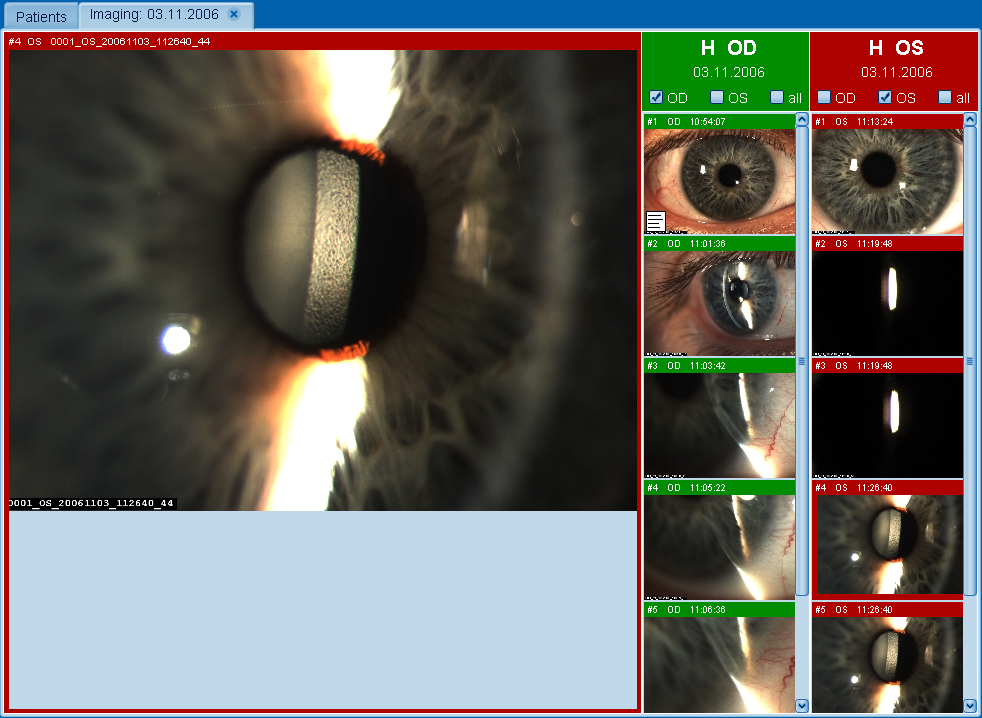
Viewing Mode
To enter the viewing mode first select the patient and then double-click on the desired examination (small slit lamp icon).
All pictures of the examination are shown in the thumbnails.

To enlarge the image double-click on it or move it with drag and drop from the thumbnail to the middle screen.
You can choose 1, 2 or 4 image display (tool bar).

Zoom
Zoom the image with the mouse wheel or use the loupe button in the tool bar

Area of zoom is displayed on the thumbnail.
Crop
Click on the "Crop image" button in the tool bar Select the area on the image and use the right mouse button to save this area as new image.
This can also be done by pressing the "Crop image" button again.
Ruler
Click on the "Ruler (pixel)" button in the tool bar Place the mouse on the area of interest in the selected image.
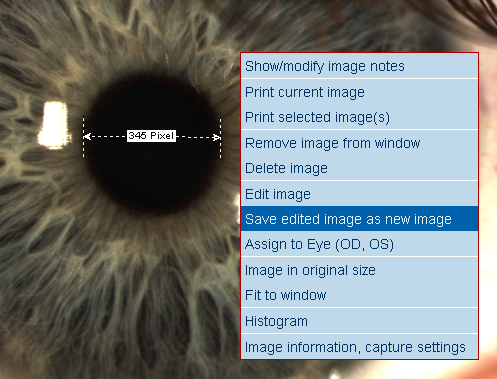
Right mouse click to save the image with the measurement.
The measurement is only displayed in image pixels and not absolute measurement.
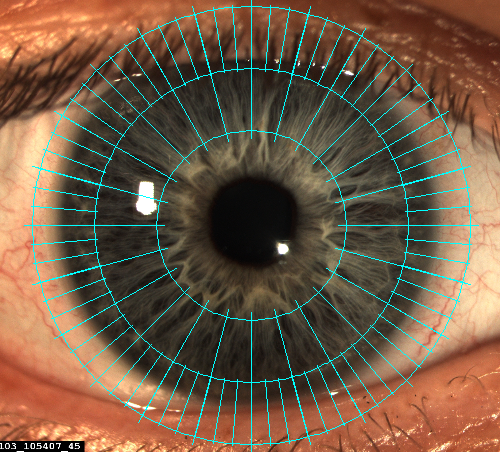
Orientation Grid
Click on the "Orientation grid" button in the tool bar Place the spider web with the mouse on the area of interest in the selected image.

Right mouse click to save the orientation grid on the image.
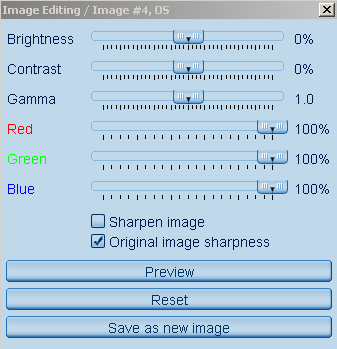
Edit Image
Click on the "Edit image" button in the tool bar

Change settings by moving the slides.
Press Preview to activate the enhancement selected.
Press Reset to go back to the original image.
Press Save as a new image to save the modified image as a copy of the original image.
The edited image is marked by an screwdriver icon (in the thumbnail.)
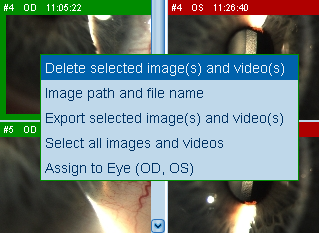
Delete/Export Image
Use the thumbnail to delete and export images.
- Select the image(s) or video(s) with Ctrl and mouse click.
- Use the right mouse button to open the following window.

If you click on "Export selected image(s) and video(s)" you will be asked if the patient data are correct.
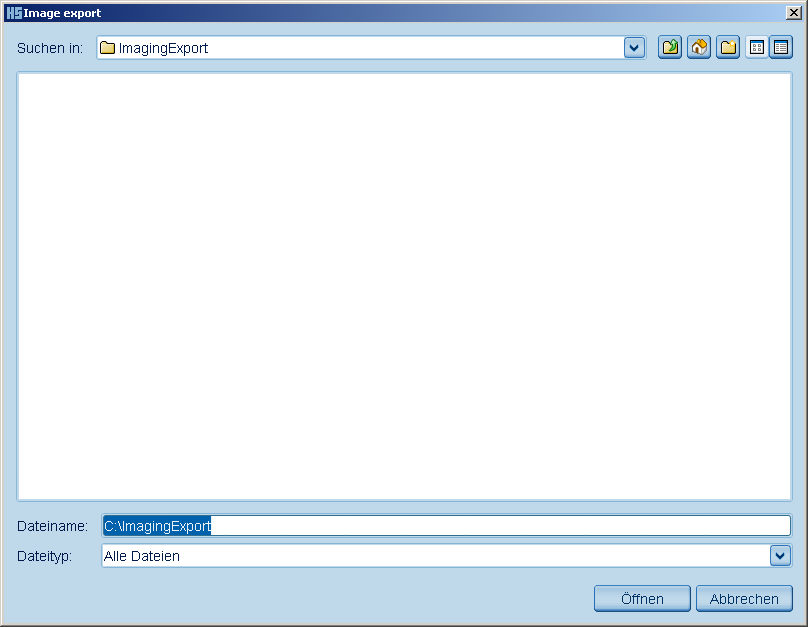
If you press "yes" the following screen will pop-up:

Type in the path.
Export all images
To "Export all images and videos from this patient and date" press the corresponding button in the tool bar and follow the screens.

Compare Examinations
Up to two examinations of a patient with different dates can be compared.
- Select the patient.
- Select the two examinations by clicking on the small slit lamp icon while holding down the "Ctrl" key.

Click on the "Show single examination view" button in the tool bar

The two examinations will be shown in the thumbnails.
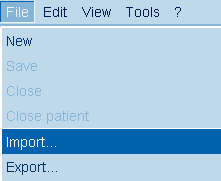
Special Import Function
All patient data, images and videos of a patient can be imported from a sub-folder.
- Go to the patient screen.
- Select "Import" in the main menu.

Select the path and the desired patient file.
Depending on the size of the file, the import may take a few seconds.
If you only have installed the viewing station you shall have limited functionality. (e.g. no image editing, no export function).
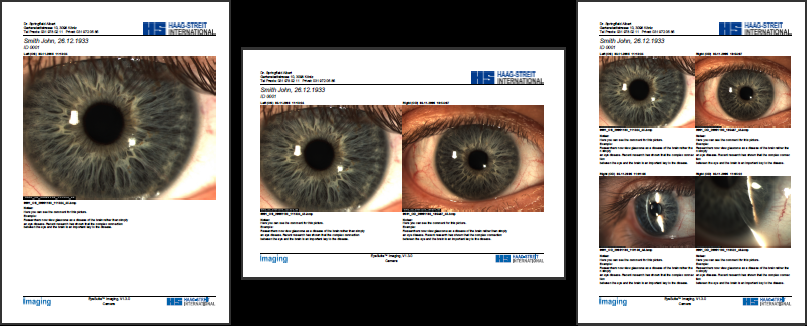
Printout
Click on the printer icon in the tool bar.
Only those pictures will be printed out which are displayed in the viewing screen (enlarged).
Printout examples

|